The
instructions below are for a
custom UI and keybind setup
made to emulate the FFXIV
default Gamepad controls in a
way that the player's muscle
memory will transfer between
both games.
(Note: this is
set up for a game resolution
of 1280x720. If you are
using a differently
resolutions, you can use
Edit Mode to resize and move
around UI elements to your
liking.)
Navigate to: Game Menu ->
Options -> Keybindings
Use the Mouse to hover over
the right-side columns for
each of the below options and
press the listed buttons on
the Gamepad.
(Important!
Do not do this for the
left-side column or you will
overwrite the default
Keyboard keybinds!)
Movement Keys
Jump: Y
Toggle Autorun: R3
Interface Panel
Toggle Game Menu: B
Toggle World Map Pane: X
Targeting
Target Previous Enemy: D-Pad →
Target Previous Friendly
Character: D-Pad ↓
Target Self: D-Pad ↑
Interact With Target: A
Target Focus: D-Pad ←
Now that we have the most
basic Gamepad keybinds set, we
will now move on to importing
the UI settings. Navigate to:
Game Menu -> Options ->
Edit Mode -> Layout
(Top-left dropdown) ->
Import
Now copy and paste the
following into the box:
2 52 0 0 0 4 4 UIParent 0.0
-343.6 -1
##$$%/&&'%)$+#,$ 0 1 0
7 7 UIParent -147.1 66.0 -1
##$$%+&%'%(#,$ 0 2 0 7 7
UIParent 147.1 66.0 -1
##$$%+&%'%(#,$ 0 3 0 4 4
UIParent 0.0 -262.3 -1
##$$%-&&'%(#,$ 0 4 0 7
7 UIParent -240.0 146.0 -1
##$$%)&%'%(#,# 0 5 0 7 7
UIParent 240.0 146.0 -1
##$$%)&%'%(#,# 0 6 0 2 8
MinimapCluster 0.0 -4.0 -1
#$$$%/&&'%(#,$ 0 7 0 1
1 UIParent -453.2 -6.0 -1
##$$%/&$'%(#,$ 0 10 0 7 7
UIParent -247.6 106.0 -1
##$$&&'% 0 11 0 7 7
UIParent 0.0 146.0 -1
##$$&&'%,# 0 12 0 7 7
UIParent 233.0 106.0 -1
##$$&('% 1 -1 0 4 4
UIParent 0.0 -180.3 -1 ##$#%#
2 -1 1 2 2 UIParent 0.0 0.0 -1
##$#%&&( 3 0 0 2 0
TargetFrame 34.0 -2.0 -1 $#3#
3 1 0 3 3 UIParent 184.7 315.8
-1 %#3# 3 2 0 0 2 TargetFrame
-31.5 -4.0 -1 %## 3 3 0
0 0 UIParent 25.2 -166.5 -1
'#(#)#-#.#/#1$3(5#6(7-7$8(9( 3
4 0 0 0 UIParent 24.7 -166.0
-1
,%-#.#/#0$1#2(3#5#6(7-7$8(9( 3
5 0 2 2 UIParent -974.8 -147.5
-1 &#*$3# 3 6 0 2 2
UIParent -984.7 -420.0 -1
-#.#/#4$5#6(7-7$8(9( 3 7 0 0 0
UIParent 20.7 -119.0 -1 3# 4
-1 0 1 1 UIParent -0.0 -526.0
-1 # 5 -1 0 7 7 UIParent 240.0
186.0 -1 # 6 0 0 2 0
MinimapCluster -4.0 0.0 -1
##$#%#&.(()( 6 1 0 1 1
UIParent 298.0 -146.0 -1
##$#%#'+(()(-$ 6 2 1 1 1
UIParent 0.0 -25.0 -1
##$#%$&.(()(+#,-,$ 7 -1 0
1 1 UIParent 0.0 -2.0 -1 # 8
-1 0 0 0 UIParent 32.0 -614.0
-1 #&$I%$&7 9 -1 0 7 7
UIParent 298.0 106.0 -1 # 10
-1 1 0 0 UIParent 16.0 -116.0
-1 # 11 -1 0 0 0 UIParent
1069.3 -518.0 -1 # 12 -1 0 1 7
MinimapCluster -54.7 -4.0 -1
##$#%# 13 -1 1 8 8
MicroButtonAndBagsBar 0.0 0.0
-1 ##$#%)&- 14 -1 1 2 2
MicroButtonAndBagsBar 0.0 10.0
-1 ##$#%( 15 0 0 4 4 UIParent
0.0 -375.5 -1 &- 15 1 0 4
4 UIParent 20.0 465.3 -1
&- 16 -1 0 5 5 UIParent
-44.7 -243.8 -1 #( 17 -1 0 1 1
UIParent -135.0 -86.0 -1 ## 18
-1 1 5 5 UIParent 0.0 0.0 -1
#- 19 -1 1 7 7 UIParent 0.0
0.0 -1 ## 20 0 0 7 7 UIParent
-0.0 206.0 -1
##$7%$&&'%(-($)#+$,$-$
20 1 0 1 1 UIParent -0.0
-566.0 -1
##$7%$&&'%(-($)#+$,$-$
20 2 0 2 0 BuffFrame -4.0 0.0
-1 ##$$%$&('((-($)#+$,$-$
20 3 1 7 7 UIParent 420.0
430.0 -1
#$$$%#&('((-($)#*#+$,$-$.-.$
21 -1 1 7 7 UIParent -410.0
380.0 -1
##%#&#'((()#*-*$+#,&-#.#/(0#1#
22 0 1 8 7 UIParent -457.0
336.0 -1
#$$$%#&('((#)U*$+$,$-#.#/U0%
22 1 1 1 1 UIParent 0.0 -40.0
-1 &('()U*#+$ 22 2 1 1 1
UIParent 0.0 -90.0 -1
&('()U*#+$ 22 3 1 1 1
UIParent 0.0 -130.0 -1
&('()U*#+$ 23 -1 0 1 1
UIParent -328.0 -186.0 -1
##$#%$&#'#(%)U+$,$-$.(/U
24 -1 1 1 1 UIParent 0.0
-182.0 -1 # 26 -1 1 4 4
UIParent 0.0 0.0 -1 #(
Now give it a name in the
lower box (such as
"XBANDFF14_720") and click the
'Import' button.
Lastly, we will assign the
Gamepad L2 and R2 trigger
keybinds to the UI we have
just imported. Navigate to:
Game Menu -> Options ->
Keybindings -> Quick
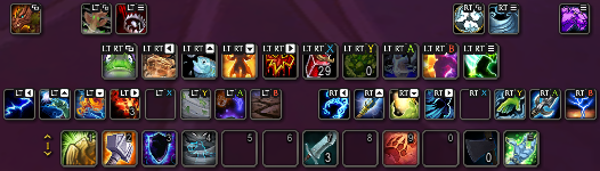
Keybind Mode. You will now use
the Mouse to hover over each
of the new visible Hotbar
buttons (ignore the original
bottom-most Hotbar). The
finished setup will appear as
below:
Making
Sense of the UI
I reserve the untouched
bottom-most Hotbar for skills
and abilities which will not
be used in combat often, but
are still handy to have
quickly accessible. For
example: buffs that last for
an hour, Resurrection spells,
profession skills, etc. These
will use the default Keyboard
keybinds of:
1,2,3,4,5,6,7,8,9,0,-,=.
Above that are two Hotbars.
The Left-hand side is for my
most active DPS rotation
skills. The keybinds are:
L2+←, L2+↑, L2+↓, L2+→, L2+X,
L2+Y, L2+A, L2+B.
The Right-hand side is for
additional DPS skills, as well
as heals/utility. The keybinds
are: R2+←, R2+↑, R2+↓, R2+→,
R2+X, R2+Y, R2+A, R2+B.
Above them is a Hotbar
reserved for major cooldowns
and survival skills. The
keybinds are: L2+R2+←,
L2+R2+↑, L2+R2+↓, L2+R2+→,
L2+R2+X, L2+R2+Y, L2+R2+A,
L2+R2+B.
Above that are another two
Hotbars. I use these for
skills that are used often,
though not necessarily in
combat. Examples are for
Mounts, transformations, and
speed increases. The Left-hand
keybinds are: Select,
L2+Select, L2+Start.
The Right-hand side keybinds
are: R2+Select, R2+Start,
Start.